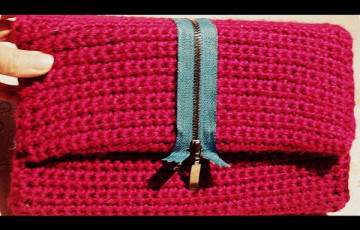
I love clutches! It's really sorry that we can't place everything we want there, but these bags are the amazing things that are indispensable for party- or glam-looks. I decided to diversify my wardrobe with handmade-stuff and after the bracelet I stated to make my own little bag! Keep reading how to make the clutch ;)
For the begining we need to choose the base. I used a box from the kitchen scale, cut it, and bent in several places, giving the form of the clutch. In the same time this paperboard was a pattern for me. I marked the lining fabric around the perimeter of the paperboard's base with the marker, and made the indentions. I need to connect this pattern of the line fabric with the paperboard and to create an internal "bag" (for the last I did a little bigger indentions, because I plan to open the clutch and put some my stuff inside ;)
I decided to decorate the clutch with a crochet fabric. For this, I crochet the fabric slightly wider than the paperboard base. And the length: the length of the paperboard base+ a few inches from the each side to create a "hoods". They will help to wear it on the base. I connected the middle with crochet inserts, that bag could be opened.
I didn't use threads, all the details were connected with the hot glue gun. First I connected the line fabric in the middle, creating little internal "bag" and after I connected it with the paperboard's base and I bent edges of the pattern inside (they will be hidden). Then I "wore" the crochet fabric outside. The bag is ready! But something is missing ... First I tried to decorate the clutch with beads, but I thought it would look too childish =) I chose a simple zipper in the same tone that the line fabric is. Texture and color of the bad and it's decoration contrasts, and therefore it looks pretty bright. I'll wear it with jeans and shorts, with dresses in the tone of the decoration. ;)

Take care and keep creating! Ask me if you need some answers ;) Love&kiss;! Meaow=*